When you’re taking a portrait shot, you want to make sure that you’re creating an image that’s going to stay with the viewer for a long time. You want an image that’s compelling, powerful and tells a story. Gina and Valerie discuss their “go to” tips for taking portraits with maximum impact. You’ll also discover how to speed up your workflow and what platforms you can use to make this process easier.
Gina and Valerie love bringing this podcast to you.
Hope you enjoy the podcast.
Sign up to the newsletter for great tips and free Lightroom presets.
Join the dynamic Gold Membership in our Community which delivers monthly tutorials, live mastermind and lots of behind the scenes videos into the creative process.
Click play to listen to the podcast or find it on iTunes here. If you don’t use iTunes you can get the feed here, or listen to us on Stitcher radio.
Show notes
There are 3 ways to take a portrait:
- Point shoot and hope for the best- No thought or planning
- Careful planning
- Intuitively ( this happens with experience)
Give them looking room
- Place your model ⅓ of the frame and leave space for them to “look” into
- To create tension do the opposite
- Low angle if you want them to look powerful
- High angle makes your model look smaller or less threatening
- Level with camera is a “normal”
- If you isolate them, they appear vulnerable
- The right position or framing can be the difference between a memorable shot and a meh shot
Why does composition matter?
- You want eyes to stay on your image for longer
- The longer they look at an image the more powerful it becomes
- We become attached to things we see all the time
You don’t have to follow these rules but if you do you will give the viewer a more comfortable experience:
- not too much head room
- breathing space
- eyes in top third of frame
- fill the frame
Listener question from Ky:
Hey guys, so I’m still on the culling thing. Does anyone use Photo Mechanic? If so, what parts of the process are you using it for? Does it help with culling speed? My old iMac’s getting a bit long in the tooth and lightroom culling is quite slow :S
Most commonly used:
- Capture one
- Lightroom
- Multiple sessions catalogues while editing big shoots then integrate to main catalogue later
- Slowness comes from rendering jpeg previews
Another option: Photo Mechanic which is browsing software only
- Multiple cards at once
- Does not import RAW files so no downtime waiting for previews to render
- Saves time in culling and editing
Check Your Computer performance
Increase cache (memory your computer uses to render files) the default is 1GB try 10-25GB depending on size of your HD
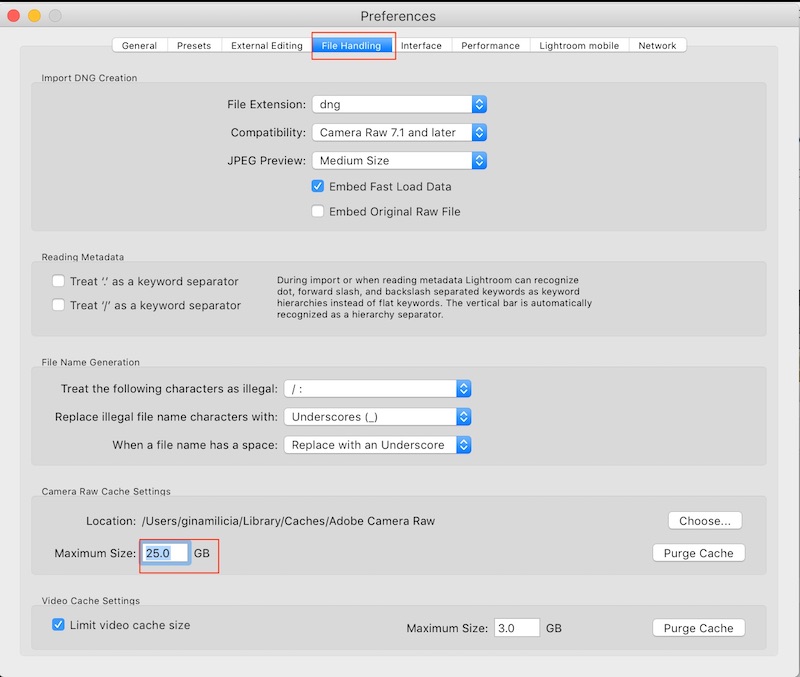
LR default cache size is 1GB try increasing this to 10-25GB for better performance
My editing/culling process:
- First sweep 1 star: Sharp/expression
- Second Sweep 2 star: Best 3-5 of each expression
- Third sweep 2 star + red: Final selections for further editing in PS

